Making an Ink Layer
-- -- -- -- -- -- -- -- -- --
-- -- -- -- -- --
The Atomic Guide to Basic
Gimp Stuff
Why?
Well, Sparky, the image you
snagged consists of black, white, and gray all on one layer.
You want to use layers to place various colors in different places, and
not mess up the blacks and grays that make the image! You
can, of course, but you started reading this so you'd learn
to make a
fancier mess than you have ever before. Good. I
knew you wanted to!
So Let's Get Started
 The things you
are going to do
are: duplicate the original, clear the background, create a
new layer for the ink, and then copy the original onto the ink
layer. Several steps and lots of buttons, so here we go:
The things you
are going to do
are: duplicate the original, clear the background, create a
new layer for the ink, and then copy the original onto the ink
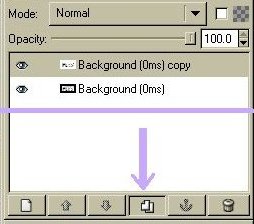
layer. Several steps and lots of buttons, so here we go:1. Since you only have one layer, "Background," hit the Duplicate Layer button in the bottom middle of the Layers window. This gives you "Background" and "Background Copy."
 2.
Rename "Background
Copy" to "Original" so you know which layer is the original image one
you started
with. You can double-click on the label, or point and right
click for Edit Layer Attributes.
2.
Rename "Background
Copy" to "Original" so you know which layer is the original image one
you started
with. You can double-click on the label, or point and right
click for Edit Layer Attributes. A big project can easily wind up with 20 or more layers! So, mark the original clearly and leave it at the bottom of the stack above Background if you need it later. (You can't move Background any higher up the stack)
 3.
Note the little Eye shape left of the layer name.
Click on the eye to turn off the visibility for the Orignal
layer. Nothing will seem to change because both layers are
the same image right now.
3.
Note the little Eye shape left of the layer name.
Click on the eye to turn off the visibility for the Orignal
layer. Nothing will seem to change because both layers are
the same image right now.4. Point and click on the Background layer (turns gray) to select that layer. The grayed layer is the only one the paint tools will affect at a time.
5. Point and click on the Image window frame to activate it. Then, just like in word processors, Edit, Select All (or Ctrl-A) to select the entire Background Layer.
 6.
It's time to turn the Background layer entirely White.
Go to the paint picker and hit the doubleheaded arrow to
switch
Black and White so White is in the left square. (Clicking on the tiny black/white boxes
will reset the
colors) The left square color is what
your paint tool will deliver
6.
It's time to turn the Background layer entirely White.
Go to the paint picker and hit the doubleheaded arrow to
switch
Black and White so White is in the left square. (Clicking on the tiny black/white boxes
will reset the
colors) The left square color is what
your paint tool will deliver7. Click on the Bucket tool (or Shift-B) to fill an area with white, and then click the bucket on the Image. The drawing will dissappear because the whole selection is now filled with white.
To recap, you selected the entire layer, selected white paint, and filled the entire selection with that color. Your original image is still safe and sound on the Orignal Layer. You can click the eye back on to see it again. OK now?
Creating the Ink Layer
So far, you've got an empty
white background layer, and your lineart safe and sound on another
layer.

Now it's time to copy the lineart onto a new layer, but only the blacks and grays. The white parts will become transparent. You do this by using the Quick Mask tool.
1. Click the New Layer button at the bottom left of the Layers window. A menu will pop up.
2. Name it "Ink Layer" and make sure the Fill Type is Transparency. Click OK, and your new layer should appear at the top of the list. If it didn't, click-drag the Ink Layer to the top of the list. Or, you can use the up and down arrows next to the New Layer button to move the layer.
3. Now fill the Ink Layer with Black. Like you did for the Background layer, do that again using Black. Click the doubleheaded arrow again to switch the black and white, or the tiny black/white box to reset the colors.
 4.
Your image area should be all black, and your layers menu
should look like this -->
4.
Your image area should be all black, and your layers menu
should look like this -->
The original image is covered by the all black Ink layer above it. Click on the eyeballs to see what happens, but make sure they are all turned on before going to the next step.
Now it's time to copy the lineart onto a new layer, but only the blacks and grays. The white parts will become transparent. You do this by using the Quick Mask tool.
1. Click the New Layer button at the bottom left of the Layers window. A menu will pop up.
2. Name it "Ink Layer" and make sure the Fill Type is Transparency. Click OK, and your new layer should appear at the top of the list. If it didn't, click-drag the Ink Layer to the top of the list. Or, you can use the up and down arrows next to the New Layer button to move the layer.
3. Now fill the Ink Layer with Black. Like you did for the Background layer, do that again using Black. Click the doubleheaded arrow again to switch the black and white, or the tiny black/white box to reset the colors.
4.
Your image area should be all black, and your layers menu
should look like this -->The original image is covered by the all black Ink layer above it. Click on the eyeballs to see what happens, but make sure they are all turned on before going to the next step.
Filling the Ink Layer
Time to copy the original
image onto the ink layer. The goal here is to remove the
white leaving only black and grays. With the Ink layer on top
of the stack, you can paint colors onto layers below the ink, and the
colors will show through the clear parts of the Ink layer.
1. Select the Original Layer, Select All (Ctrl-A), and Copy (Ctrl-C) the selection.
 2.
Select the Ink Layer again so it is active
2.
Select the Ink Layer again so it is active
3. Click the red square QuickMask button at the bottom left of the Image Area.
4. Paste (Ctrl-V) the selection (the Original image) onto the QuickMask. This will give you a Red on Black display like this!

5. Good so for, but now for the special effects -- Turn the QuickMask off. Click the Red Square again, and you'll see this lovely zebra stripey thing.

6. OK - Leap of faith time! Edit, Cut (Ctrl-X) to remove all the extra black. Ta Dahh! What's left is either clear, black, or gray. Why doesn't it look any different? Because the formerly white areas are now clear, you are seeing through them to the White Background layer. Turn off the Background to see a checkerboard pattern used to reveal transparent areas.

7. You have now created your Ink Layer! Time to save your work. File, Save, etc.
Credit: Thanks to the Candi Line Art Tutorial for my first understanding of this technique.
1. Select the Original Layer, Select All (Ctrl-A), and Copy (Ctrl-C) the selection.
2.
Select the Ink Layer again so it is active 3. Click the red square QuickMask button at the bottom left of the Image Area.
4. Paste (Ctrl-V) the selection (the Original image) onto the QuickMask. This will give you a Red on Black display like this!
5. Good so for, but now for the special effects -- Turn the QuickMask off. Click the Red Square again, and you'll see this lovely zebra stripey thing.
6. OK - Leap of faith time! Edit, Cut (Ctrl-X) to remove all the extra black. Ta Dahh! What's left is either clear, black, or gray. Why doesn't it look any different? Because the formerly white areas are now clear, you are seeing through them to the White Background layer. Turn off the Background to see a checkerboard pattern used to reveal transparent areas.
7. You have now created your Ink Layer! Time to save your work. File, Save, etc.
(Blessed are the Pessimists, for
they Shall have made Backups - Frequently!)
Credit: Thanks to the Candi Line Art Tutorial for my first understanding of this technique.
The Next Step -->
Coloring